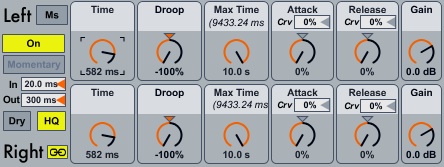
UltraComb

Overview
UltraComb uses 32 taps on a delay line to create comb-filtering effects. By using individual taps instead of a feedback loop, you can manipulate the delays independently of each other.
Pitch / Time
Both of these controls affect the pitch and timing of the filter. Unsurprisingly, the Pitch control is much more suited for pitched effects. The number-box on the pitch control is for fine tuning. You can fatten the sound by slightly detuning the left and right channels. The Time control sets the delay time in milliseconds. Youll notice that you will only get pitched sounds in the lowest part of its register (roughly 35 milliseconds or less), but it’s also useful for creating rhythmic effects, particularly in conjunction with the Droop control.
Droop
The Droop control shapes the times of the delay line. Negative values will produce fall-off or decelerating effects depending on the length of the base delay. Positive values will produce the opposite effect.
In an ordinary comb filter, delays are spaced perfectly evenly, e.g. at 0.1, 0.2, 0.3, 0.4, 0.5, 0.6, 0.7, 0.8, 0.9, and 1. Droop takes these times and applies an exponent to them, making what had looked like a straight line turn into a curve. For example, when you square the values (0.01, 0.04, 0.09, 0.16, 0.25, 0.36, 0.49, 0.64, 0.81, 1), the values are now closer to the beginning than they are to the end. This will produce a decelerando when multiplied by a bigger delay time, or a downwards gliss when multiplied by a short delay time.
Max Time
This control determines how many taps are on at a time. Because there are only 32 taps, if you choose a very short delay time (e.g. 10 ms), the effect will go on for 320 ms even if the Max Time is set higher than this. There is, however, an indicator on the Max Time panel which shows the maximum length of the effect at the current delay time.
This control will affect both the length of the affect as well as the strength of its pitch.
HQ Mode
You may have noticed some noise when changing the Pitch, Time, or Droop controls when this switch is off. This is most noticeable on pitched, sustained sounds. This noise happens because the delay times are changing; it’s akin to the sound you get when you manually move the needle on a record to a different location. To avoid this sound, you can select the HQ switch which uses an interpolating delay instead of the plain delay. The interpolating delay cross fades between two delays, avoiding the noise. Because it requires twice as many delays, it is moderately more CPU-intensive.
Attack and Release
Attack fades in the taps at the beginning, and Release does the same for the end. These values are specific to the amount set by the actual Max Time (the parenthetical value on the Max Time panel). The combination of these two is always scaled to be out of 100%.
| Attack | Release | Result |
| 100% | 0% | Fade in over 100% |
| 0% | 100% | Fade out over 100% |
| 100% | 100% | Fade in for 50%, fade out for 50% |
| 50% | 50% | Fade in for 50%, fade out for 50% |
Settings
Pitch/Ms switches between choosing delay time via pitch (MIDI) values or millisecond values. You can choose much longer times in milliseconds and use the unit as more of a delay.
On/Off and Momentary turn the effect on and off. Both of these are affected by the In and Out times below, which set the fade durations for both buttons. Momentary goes for as long as you hold it.
Dry adds the unaltered signal back in while the effect is on. This is especially helpful for providing clarity in situations where the filter is fading in.
The Link button enables the Left and Right controls to move in tandem.